

The Scorecard Manager in NiCE CXone Quality Management (CXone) is a centralized interface for creating, managing, and monitoring scorecards used in evaluating agent performance. Scorecards define the criteria and metrics for assessing interactions, ensuring consistent quality standards across teams.
You must have these permissions to access and manage Scorecards:
-
QM Tools Permissions > Auto Score > Scorecard:
-
Admin: All Permissions (View, Edit, Update, Delete)
-
Manager: All Permissions (View, Edit, Update, Delete)
-
Evaluator/ Supervisor Workspace (Supervisor): View only
-
app: No access
-
If you cannot create or edit a Scorecard, check with your administrator. The administrator can find these permissions in NiCE CXone. Go to Admin > Security Settings > Roles and Permissions and select the role.
-
QM Tools Permissions > Auto Score > Dashboard:
-
Admin, Manager, Evaluator/Supervisor: View
-
Agent: No access
-
Manage Scorecard
The Scorecard Manager grid lets you keep track of Scorecards at a glance. You can edit a Scorecard directly from the grid by clicking on it. You organize the view by filtering the Scorecard based on its status.
In addition to the Scorecard name, the following fields are also available in the grid:
|
Column |
Details |
|---|---|
| Scorecard Name |
The title that identifies a scorecard used for evaluating agent performance. |
| Number of Profiles |
The count of evaluation profiles linked to the scorecard. |
| Last Modified | The date and time when the scorecard was last updated. |
| Created By | The name or ID of the user who created the scorecard. |
| Status |
Possible Scorecard statuses:
|
| Actions |
These actions are available in the grid:
You can select several scorecards at once to activate, deactivate or delete. Delete the scorecard if you will never be using a scorecard. This will help you keep the scorecard list as clean as possible. |
Create Scorecards
The scorecard is the central evaluation model used by Auto Score. It defines which profiles are evaluated, their contribution to the final score, and the conditions for scoring. The scorecard is where Auto Score links directly to important business goals such as quality, compliance, and customer experience. Let’s see how the scorecard is designed to be both simple and effective.
In NiCE CXone Quality Management (CXone), you can create a new scorecard from scratch duplicate an existing one and modify its content. Scorecards allow you to:
-
Assign scores to individual questions.
-
Build dynamic forms that adapt based on responses.
-
Define critical questions that must be answered correctly for a successful evaluation.
After creating a scorecard, remember to activate it before it can be used in evaluations.
To create a new scorecard:
- Click the app selector
 and select Quality Management (CXone).
 -
Click Scorecard under AUTO SCORE.
-
Click New Scorecard.
-
Name your Scorecard. It is optional to add description.
-
From the Scorecard Schedule, do the following:
-
Select Time zone from the dropdown. The default is your computer's time zone. If your time zone is not listed in the Time Zone filter, (UTC+00:00) Greenwich Mean Time (GMT) is selected by default.
You cannot change the time zone once the scorecard is saved and activated. Any existing scorecards without a defined time zone will display (UTC+00:00) Greenwich Mean Time.
-
Define the From and To dates for the scorecard validity.
-
Choose Full day or specify a preferred duration.
-
Set Interaction Coverage (For example, 100%).
What happens when coverage is below 100%:
When you select a coverage percentage below 100%, Auto Score does not choose interactions randomly. Instead, the system uses statistically significant sampling.
Here’s what that means in practice:
-
The system reviews all eligible interactions.
-
It selects a subset that accurately represents the overall population.
-
Selected interactions are distributed across time, agents, and volume.
-
No single agent, shift, or time period is overrepresented.
-
The sample reflects typical day-to-day behavior rather than outliers.
This approach ensures results remain reliable and meaningful, even when not all interactions are scored.
Why Statistical Sampling matters?:
If we don’t use a disciplined approach, partial coverage can quickly lead to bias. For example, bias can happen if we only score busy hours, certain agents, or focus on specific days.
Auto Score helps prevent this by:
-
Spreading scoring evenly throughout the schedule.
-
Making sure each agent is represented fairly.
-
Keeping trend accuracy consistent over time.
-
-
From the Assign Evaluation Profile dropdown, choose one or more profiles from the list. The selected profiles will appear below the dropdown (For example, Proper Greeting, Problem Solving, Closing Summary). To view profile details. Expand a Profile: Click the arrow next to the profile name (For example, Proper Greeting) to view its details.
Multiple profiles can be assigned to a single scorecard. Expanding each profile helps evaluators understand scoring standards and expectations.
-
Define your Filtering parameters. The scorecard will only sample evaluations that match these filters.
 What are the available filters?
-
From the Agents section, do the following:
-
Choose one or more Teams from the list. The selected teams will appear in the field. From the drop-down lists, select Teams and then Groups. The system loads the first set of available entries (up to 250 Teams or 200 Groups). Additional entries load automatically as you reach the end of the list (if supported), or you can use the search field to find the next set.
-
Select the desired Groups from the list.
-
Check the Current total number of agents displayed below the fields to confirm the selection.
Selecting teams and groups determines which agents will be evaluated using this scorecard. Ensure the correct teams and groups are chosen to align with your evaluation goals.
-
-
Save the scorecard. You can either Save & Activate to activate the scorecard immediately, or Save as Draft. If you save the scorecard as a draft, you will have to activate it from the Scorecards grid.

Review Forecast Overview
Based on the Example: The forecast helps you estimate the expected interaction volume to be evaluated by Auto Score, using historical data and your scorecard configuration.
Scorecard Duration: This shows how many days the scorecard will be active. In this example, it runs for 42 days. This period is used to calculate the forecast.
Next is the Average Daily Interactions: This number is calculated automatically using data from the past six months. Auto Score checks previous interaction volumes for the right channels and scope, then finds the daily average.
Finally, the Approximate Forecasted Interaction Volume uses both of these numbers: The system multiplies the scorecard duration by the average daily interactions to estimate the total number of interactions that will be scored during this time. This forecast is just an estimate, not a strict limit. It is meant to give you insight and help you plan, set capacity expectations, and understand usage before you start the scorecard.
The Forecast Overview panel provides a quick summary of the expected evaluation scope based on your scorecard settings. It includes:
-
Scorecard Duration (Days): Displays the total number of days the scorecard will remain active, calculated from the selected start and end dates.
-
Average Daily Interactions: Shows the estimated number of interactions that will be evaluated per day, helping you plan workload and resources.
-
Approx Forecasted Interaction Volume: Indicates the total projected number of interactions that will be scored during the entire scorecard period.
The Score Logic:
Auto Score calculates the final Scorecard result using a weighted average. This ensures that more important behaviors have a greater influence on the final score.
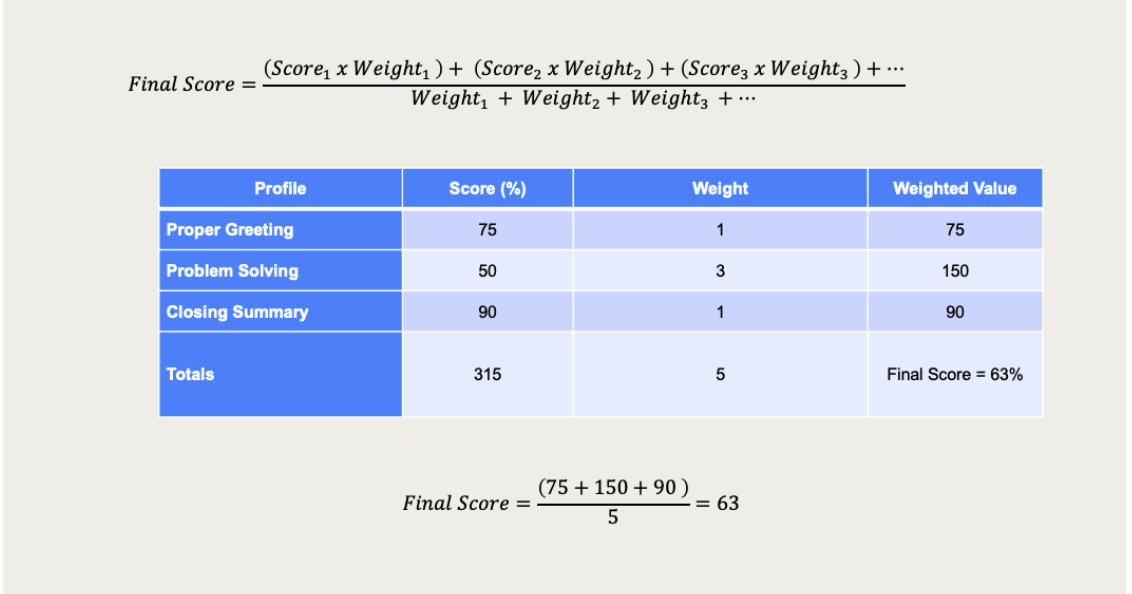
The Scoring Formula
The final Scorecard score is calculated as: Final Score = (Sum of each Profile Score × Profile Weight) divided by (Sum of all Profile Weights)
In simple terms:
-
Each Profile produces a score between 0% and 100%.
-
Each Profile has a weight that represents its importance.
-
Scores are multiplied by their weights.
-
The final result is the weighted average of all Profiles.
How the formula works?
In this example, the Scorecard includes three Profiles.
| Profile | Score (%) | Weight | Weighted Value |
|---|---|---|---|
| Proper Greeting | 75 % | 1 | 75 |
| Problem Solving | 50 % | 3 | 150 |
| Closing Summary | 90 % | 1 | 90 |
Step by Step Calculation
-
Multiply each Profile score by its weight
-
Proper Greeting: 75 × 1 = 75
-
Problem Solving: 50 × 3 = 150
-
Closing Summary: 90 × 1 = 90
-
-
Add all weighted values
-
75 + 150 + 90 = 315
-
-
Add all weights
-
1 + 3 + 1 = 5
-
-
Divide the total weighted score by the total weight.
-
Final Score = 315 ÷ 5 = 63%
What weights mean:
Weights determine the level of influence each Profile has on the final Scorecard score.
-
A higher weight indicates that the Profile has a greater impact.
-
A lower weight means the Profile contributes less to the overall score.
-
Weights are assigned based on business priorities rather than task difficulty.
For example:
-
Problem Solving receives the highest weight.
-
A low score in Problem Solving significantly affects the final result.
-
High scores in lower weight Profiles cannot compensate for weak performance in high priority areas.